Inconsequential ramblings of an Old Git

Discussions and updates on your new bike, your new build, your wishes, wants and desires
User avatar
mangocrazy
Posts: 6574
Joined: Tue Dec 22, 2020 9:58 pm
Has thanked: 2322 times
Been thanked: 3426 times

Re: Inconsequential ramblings of an Old Git

Post by mangocrazy »

Then another tool is used to ensure the PTFE inner is clear and the braid is pushedout of the way to allow the olive to be seated over the PTFE inner.

DSCF3007.JPG
DSCF3007.JPG (350.36 KiB) Viewed 443 times


Then the olive is fitted over the outside of the PTFE inner and tapped home.

DSCF3009.JPG
DSCF3009.JPG (315.78 KiB) Viewed 443 times

And lastly the ferrule is screwed onto the fitting, and that should be that...

DSCF3013.JPG
DSCF3013.JPG (256.48 KiB) Viewed 443 times
There is no cloud, just somebody else's computer.
User avatar
mangocrazy
Posts: 6574
Joined: Tue Dec 22, 2020 9:58 pm
Has thanked: 2322 times
Been thanked: 3426 times

Re: Inconsequential ramblings of an Old Git

Post by mangocrazy »

Skub wrote: Thu Feb 17, 2022 4:41 pm Well thunked out.

I'm still buying ready made. :lol:
Yeah, don't blame you. The only reason I went down this route was to save some dosh. I need brake and clutch lines for the VFR and the Falco and if I had them made up, it would be well north of £250.
There is no cloud, just somebody else's computer.
User avatar
mangocrazy
Posts: 6574
Joined: Tue Dec 22, 2020 9:58 pm
Has thanked: 2322 times
Been thanked: 3426 times

Re: Inconsequential ramblings of an Old Git

Post by mangocrazy »

After all that faffing about with the LC...

It's still bloody leaking oil!!!

It appears I have a serially incontinent LC...
There is no cloud, just somebody else's computer.
User avatar
mangocrazy
Posts: 6574
Joined: Tue Dec 22, 2020 9:58 pm
Has thanked: 2322 times
Been thanked: 3426 times

Re: Inconsequential ramblings of an Old Git

Post by mangocrazy »

After further investigation (and consultation with the LC nutters on the RDLC forum) it appears that oil is weeping past the little alloy bungs that blank off the holes for the shift fork spindles. Apparently they work loose over time and start weeping oil. The cure (allegedly) is to give them a little tap (nothing too violent) to re-seat them and allow them to seal again. There are two such bungs, one by the neutral switch plate, and the other just behind the gearbox sprocket.

Just to be sure I've ordered a pair of new ones from Fowlers and if the weeping continues I'll be removing the ones in there at present and seating the new ones on a bed of silicone sealant. But I'll give the tap treatment a go first, as that's the easiest thing to do and I'm a lazy cnut.
There is no cloud, just somebody else's computer.
User avatar
Yorick
Posts: 16375
Joined: Sat Mar 14, 2020 8:20 pm
Location: Paradise
Has thanked: 9940 times
Been thanked: 6704 times

Re: Inconsequential ramblings of an Old Git

Post by Yorick »

My sad showed me a trick to stop gearbox oil seal weeping.
Get a centre punch and tap the casing about every 5mm around the seal.
User avatar
mangocrazy
Posts: 6574
Joined: Tue Dec 22, 2020 9:58 pm
Has thanked: 2322 times
Been thanked: 3426 times

Re: Inconsequential ramblings of an Old Git

Post by mangocrazy »

When I came to inspect the gearbox sprocket area I was quite surprised by the amount of oil that seeped out since I last had a butchers. You can clearly see that the forward bung (circled in red) is wet with oil and there is a fair old pool of it in the crankcase web.

DSCF3037.JPG
DSCF3037.JPG (380.51 KiB) Viewed 371 times

I cleaned up all the oil using paper towels and brake cleaner and then gave the bungs a restrained (but still manly) tap with a drift and hammer. And then took a photo, cos I thought you'd want me to. The shy, retiring back bung is ringed in red this time.

DSCF3043.JPG
DSCF3043.JPG (378.64 KiB) Viewed 371 times

So will this cure the leak? Tune back in later in the month for another exciting episode of 'Incontinence in Sheds'...
There is no cloud, just somebody else's computer.
User avatar
weeksy
Site Admin
Posts: 23051
Joined: Sat Mar 14, 2020 12:08 pm
Has thanked: 5387 times
Been thanked: 12844 times

Re: Inconsequential ramblings of an Old Git

Post by weeksy »

It's actually interesting not dull, well to me anyway.
User avatar
Noggin
Posts: 7754
Joined: Thu Mar 19, 2020 1:46 pm
Location: Ski Resort
Has thanked: 15688 times
Been thanked: 3777 times

Re: Inconsequential ramblings of an Old Git

Post by Noggin »

weeksy wrote: Tue Mar 01, 2022 5:07 pm It's actually interesting not dull, well to me anyway.
Me too! I doubt I'll ever do much of it, but I love reading about it
Life is for living. Buy the shoes. Eat the cake. Ride the bikes. Just, ride the bikes!! :bblonde:
Supermofo
Posts: 4908
Joined: Mon Mar 16, 2020 3:39 pm
Has thanked: 4227 times
Been thanked: 2773 times

Re: Inconsequential ramblings of an Old Git

Post by Supermofo »

Slight thread derail as know it's a different bike and probably colour Mango but did you want my 690 headlight mask? I sold mine with the plain black one Weeksy gave me with the screen fitted. The OE one is sitting in my garage if you want it. No charge other than post.

Sorry for having my ugly fizzog in it but it's this colour.
[media]Image
User avatar
mangocrazy
Posts: 6574
Joined: Tue Dec 22, 2020 9:58 pm
Has thanked: 2322 times
Been thanked: 3426 times

Re: Inconsequential ramblings of an Old Git

Post by mangocrazy »

That's exceptionally decent of you - thanks! Does it just cover the headlight, or does it also extend past the headlight? reason is, I have a Puig flyscreen that might conflict with it.
There is no cloud, just somebody else's computer.
Supermofo
Posts: 4908
Joined: Mon Mar 16, 2020 3:39 pm
Has thanked: 4227 times
Been thanked: 2773 times

Re: Inconsequential ramblings of an Old Git

Post by Supermofo »

It's essentially this part. I seem to recall you undo 3 screws either side and pull out/replace. My Puig screen involved drilling holes in the mask so Weeksy bought a spare like in the pic and drilled that. He kindly gave me that drilled mask with the screen so I took off my OE one.

Image
User avatar
mangocrazy
Posts: 6574
Joined: Tue Dec 22, 2020 9:58 pm
Has thanked: 2322 times
Been thanked: 3426 times

Re: Inconsequential ramblings of an Old Git

Post by mangocrazy »

Ah, OK. So basically it's a replacement for the part that I had to drill to fit the Puig fly screen? In that case it would be churlish of me to refuse. If you PM me your Paypal details with how much you want for postage I'll get it sorted.

And thank you.
There is no cloud, just somebody else's computer.
Supermofo
Posts: 4908
Joined: Mon Mar 16, 2020 3:39 pm
Has thanked: 4227 times
Been thanked: 2773 times

Re: Inconsequential ramblings of an Old Git

Post by Supermofo »

No worries. Yes it's the part you had to drill.

I'll grab it out the garage and see how best to post. Think the Mrs usually does Hermies as they collect at the local shop.
User avatar
mangocrazy
Posts: 6574
Joined: Tue Dec 22, 2020 9:58 pm
Has thanked: 2322 times
Been thanked: 3426 times

Re: Inconsequential ramblings of an Old Git

Post by mangocrazy »

Aside from the LC, another of the bikes I'm working on (the VFR this time) is having trouble containing some of its fluids - brake fluid in this instance. My initial thought was that the brake lines I've made up for it had failed, but that wasn't so. It was the calipers that were leaking, and as I'd modified them, I was pretty sure it was a self-inflicted wound. It was...

What I haven't mentioned is that apart from non-OE forks, brake calipers and wheel, the brake discs are also non-OE, in fact I've never seen another pair like them. They were an ebay purchase from someone who had very little idea what they were. They are a full 320mm diameter (RC30 OE are 310mm) and are not only drilled axially, but also vented radially. They are also ductile iron (not stainless) and came with magnesium carriers, FFS. As a consequence of the radial drilling/venting the discs are noticeably thicker than normal, measuring about 6.7mm. 'Normal' discs all tend to be about 5mm thick when new. This means that caliper to disc clearance is marginal, to say the least, and it quickly became apparent that if I wanted to use my 4-pad Brembos with these discs that this clearance would need to be increased.

So I got in touch with one of the 'makers' on the Mig welding forum I also frequent and asked him if he could laser cut some distance pieces from 1mm aluminium plate. 1mm doesn't sound much, but it would make the difference between unwanted contact and spinning freely. Matt was optimistic he could do it so I sent him the caliper halves for him to assess. He replied in the affirmative and sent me these photos of the parts he'd cut. Perfect.

1mm_inserts_for Brembo_caliper.png
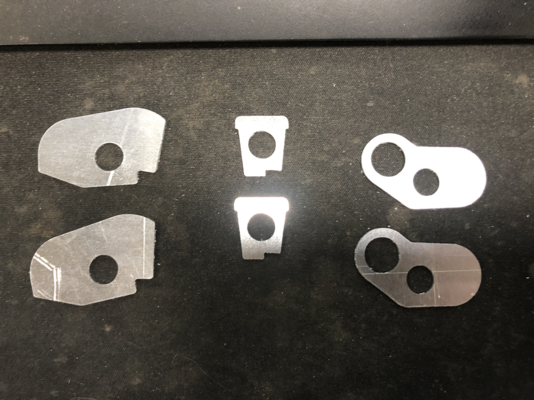
1mm_inserts_for Brembo_caliper.png (317.9 KiB) Viewed 494 times

He'd also mounted them up to a caliper half so I could check the fit, and all looked exactly what I wanted. To top it all off he only charged me the excessively reasonable price of £30 inc. P&P. Bargain!

1mm_inserts_fitted_to_Brembo_caliper.png
1mm_inserts_fitted_to_Brembo_caliper.png (334.09 KiB) Viewed 494 times

What I now needed to do was to find a larger o-ring to make the seal between the two caliper halves. The extra 1mm I'd added to the area to be sealed meant I needed an o-ring with a substantially larger cros-section. The only one I could find that matched my requirements in EPDM was 2.62mm cross section, 10.47mm outside diameter. This fitted the hole perfectly and would hopefully be chunky enough to seal the two halves.

You can probably guess where this is going by now...

So the caliper halves were reassembled with the distance pieces and heftier o-rings installed, pads and retainers fitted and then bolted up to the bike. Then it was time to fill the master cylinder reservoir with brake fluid and start the tedious bleeding process. I tend to use a syringe with hose attached to the caliper bleed nipple to draw fluid down from the reservoir. So I was well placed to observe the drip drip of brake fluid onto the floor coming from the brake caliper. Bugger. Panic stations ensued as I tried to minimise the spread of brake fluid to wheel, pads, disc, tyre, floor etc. etc. I hate brake fluid - nsaty stuff.

So now it was back to the drawing board. Larger cross section o-rings of that o.d. simply aren't available, so the only way I could seal the two caliper halves was to make a gasket out of 3mm EPDM sheet, using two hollow punches - a 10mm and a 5.5mm. This would give me a wider sealing area and a larger cross section. And as I'm a believer in belt and braces, I also used Threebond TB1215 RTV instant gasket on both caliper faces. The calipers were then torqued up to 25Nm and left on one of our radiators for a couple of days to cure.

And I'm relieved to say, that appears to have cured the problem. I bled the brakes without seeing any fluid leaks and have left the system under pressure with a rubber band around the brake lever and throttle grip. If there are still no drips when I check tomorrow I'm calling that a result.
There is no cloud, just somebody else's computer.
Mr. Dazzle
Posts: 13586
Joined: Mon Mar 16, 2020 7:57 pm
Location: Milton Keynes
Has thanked: 2509 times
Been thanked: 6053 times

Re: Inconsequential ramblings of an Old Git

Post by Mr. Dazzle »

I'm half impressed, half "FFS dude what the hell are you thinking?" over the idea of spacing the callipers like that. :lol:

It's exactly the sort of thing I'd do on a test vehicle to get you through something, only for it to be replaced with a 'proper' set up ASAP. Mostly cause you'd expect sealing issues a mile off.

Can't see why it wouldn't work....in fact I thibk it will work at least at first....it just sets my spidey sense off you know?
User avatar
mangocrazy
Posts: 6574
Joined: Tue Dec 22, 2020 9:58 pm
Has thanked: 2322 times
Been thanked: 3426 times

Re: Inconsequential ramblings of an Old Git

Post by mangocrazy »

If I had the facilities to machine up a new set of calipers I wouldn't be doing this. But clearly I don't... And I got the idea from a race team that I used to know well, who were running thicker discs and had exactly the same issues. They spaced the calipers out in the exact same way, and then subjected it to the toughest testing of all - racing. It worked for them and I see no reason why it shouldn't work (and continue working) for me. I'm pretty sure that if it was going to fail it would have already done so by now. I checked a short while ago and there were no leaks, but an impressively solid feel at the front brake lever. So I'm cool with that. YMMV.

However the other bike in the shed IS still leaking. The Tap treatment on the shift shaft plugs was entirely ineffective and I will now need to drain the gearbox oil (again), drill and tap the plugs, slide-hammer them out, clean any crap out and seat the new plugs on a bed of sealant. What joy.

But at least the VFR now has brakes.
There is no cloud, just somebody else's computer.
User avatar
Horse
Posts: 11278
Joined: Sun Mar 15, 2020 11:30 am
Location: Always sunny southern England
Has thanked: 5941 times
Been thanked: 4961 times

Re: Inconsequential ramblings of an Old Git

Post by Horse »

mangocrazy wrote: Tue Mar 01, 2022 12:22 pm I'm a lazy cnut.
This thread demonstrates amply that you are nothing of the sort! ;)
Even bland can be a type of character :wave:
User avatar
mangocrazy
Posts: 6574
Joined: Tue Dec 22, 2020 9:58 pm
Has thanked: 2322 times
Been thanked: 3426 times

Re: Inconsequential ramblings of an Old Git

Post by mangocrazy »

After having seen the pool of oil under the LC (and the VFR's earlier issues) I was reminded of a Nick Cave tune...


https://www.youtube.com/watch?v=thHx7cdoaAc
There is no cloud, just somebody else's computer.
User avatar
mangocrazy
Posts: 6574
Joined: Tue Dec 22, 2020 9:58 pm
Has thanked: 2322 times
Been thanked: 3426 times

Re: Inconsequential ramblings of an Old Git

Post by mangocrazy »

And here (belatedly) are a couple of pics of the Brembo 4-pad calipers fitted to the VFR's RC30 forks using my home-brewed brackets. I have to confess I did have my doubts whether the idea would actually work, but it does appear to have. No road test as yet, but the bike has been loaded onto the van for its trip to have its exhaust fettled and the brakes held the plot steady on the ramp, so all good so far.


DSCF3062.JPG
DSCF3062.JPG (555.08 KiB) Viewed 410 times

And the longer view...


DSCF3067.JPG
DSCF3067.JPG (912.13 KiB) Viewed 410 times

In other news, the LC has had its gearbox oil drained (again) and is now in the air at a suitable working height (courtesy of the Abba Skylift) awaiting removal of its leaking oily plugs.
There is no cloud, just somebody else's computer.
User avatar
mangocrazy
Posts: 6574
Joined: Tue Dec 22, 2020 9:58 pm
Has thanked: 2322 times
Been thanked: 3426 times

Re: Inconsequential ramblings of an Old Git

Post by mangocrazy »

Yesterday was a bricklaying kinda day (first of the year) but today has been an 'idly dicking about with the LC when I CBA' kinda day. I really need to get all the liitle jobs on it finished and get it packed off to Dave (muttsnuts) for him to fine tune the fuelling and jetting. So after a late breakfast I headed out into the shed armed with a cordless drill and a selection of drill bits. After a few minutes, this was the scene:

DSCF3072.JPG
DSCF3072.JPG (564.35 KiB) Viewed 382 times

Being ali the little plug didn't put up too much resistance. It's only 4mm deep and there is an air gap before you hit the end of the selector shaft. I drilled a pilot, then a 5mm hole as 5mm is the tapping clearance for an M6 x 1.0 thread. The plan was to tap an M6 thread then use some kind of slide hammer type arrangement to get the plug out. I was secretly hoping that the action of tapping an M6 thread would cause the plug to loosen its grip and come free; and believe it or not that was exactly what happened. Not just for one but both. That made life a whole lot easier.

I then cleaned up the holes with a mixture of paper towels, brake cleaner, vacuum cleaner and compressed air. But not at the same time. That would have been silly. Then I dug out the tube of Threebond I've been using for years and painted TB1215 over plugs and holes and tapped the plugs into the holes using a drift. One went in dead easy - the other put up a bit of a fight. Guess which is which...

DSCF3073.JPG
DSCF3073.JPG (497.43 KiB) Viewed 382 times

And just to prove that I really did remove two plugs and replace them with new, here are the ones that came out:

DSCF3077.JPG
DSCF3077.JPG (452.04 KiB) Viewed 382 times

So the new plugs will be left for a day or two (or three or four) for the TB to cure, and then the gearbox will be re-filled. Then we find out whether this has all been worth it or not. And having had a look at the grooves on the clutch pushrod where it encounters the oil seal, that is also getting renewed.

Time for a sit down and a nice cup of tea...
There is no cloud, just somebody else's computer.