Boat build project

What non motorbike related things are you doing, making, building, planning or designing
Zimbo
Posts: 204
Joined: Mon Apr 06, 2020 5:04 pm
Location: Gloucestershire
Has thanked: 87 times
Been thanked: 135 times

Boat build project

Post by Zimbo »

I thought I'd stick this up here because I know quite a few forum members like boats, and even build boats, my efforts may afford some amusement and I might even get some good advice.
So I like boats, and have had a few powerboats over the years but sold the last one five years ago because I couldn't justify the cost of running it against the few times I got to use it every year (23' cuddy with a 5.7l V8 volvo penta)
I feel in need of a little project and thought about building a boat. Just a little one, because I've never built one before. See if I can do it, and if it holds together / floats / doesn't immediately capsize.
Even better if it was light enough to stick on the car roof, but not a canoe / kayak, too unstable and it would be nice to have a little outboard on the back.
I did some web research and found a designer in the states with loads of plans, decided on a 14' flat bottom skiff because it looked easy to build and weighs around 50kg, and will apparently plane with two people on board with around a 6hp outboard.
Went out to the car with a tape measure, to see what 14' looked like on the roof, decided I was being too adventurous.
Scaled my aspirations back down to an 11' version, 30 odd kilos. So, I'm having a go at it.
The plan is to end up with something like this:
Image

Are we interested to see how it goes?
User avatar
Yorick
Posts: 16736
Joined: Sat Mar 14, 2020 8:20 pm
Location: Paradise
Has thanked: 10263 times
Been thanked: 6885 times

Re: Boat build project

Post by Yorick »

Cool. When we moved here we thought there'd be lots of folk into boating. But nada.
cheb
Posts: 4904
Joined: Tue Mar 17, 2020 6:51 am
Been thanked: 2615 times

Re: Boat build project

Post by cheb »

Yes, we are interested.
Silly Car
Posts: 854
Joined: Mon Mar 16, 2020 7:53 pm
Has thanked: 143 times
Been thanked: 497 times

Re: Boat build project

Post by Silly Car »

Definitely interested in a build thread :thumbsup:
Zimbo
Posts: 204
Joined: Mon Apr 06, 2020 5:04 pm
Location: Gloucestershire
Has thanked: 87 times
Been thanked: 135 times

Re: Boat build project

Post by Zimbo »

Splendid!
I've spunked £36 on the plans and gone shopping. It's constructed using the "stitch and glue" method out of three sheets of 6mm ply and one of 12mm ply, I reckon it'll cost me £200 in materials, painted.
So, I need to convert this into something looking like the above ...
Image
Image
Zimbo
Posts: 204
Joined: Mon Apr 06, 2020 5:04 pm
Location: Gloucestershire
Has thanked: 87 times
Been thanked: 135 times

Re: Boat build project

Post by Zimbo »

I started this afternoon.
Needed a platform to work off, so made up something to act as saw horses out of some spare dexion and started marking up the first panel

Image

Image

Image
Zimbo
Posts: 204
Joined: Mon Apr 06, 2020 5:04 pm
Location: Gloucestershire
Has thanked: 87 times
Been thanked: 135 times

Re: Boat build project

Post by Zimbo »

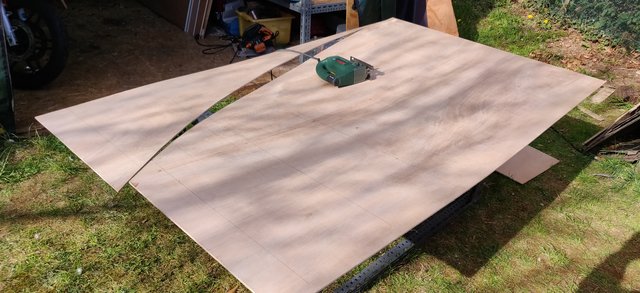
I started with the bottom, made from two bits of 6mm ply. Marked them out from the plans, and then needed a cheap way of drawing a curve. Came up with an idea of slicing a strip of ply off the end of a sheet, screwing some long screw into the board at the datum points 300mm apart, and using the ply as a flexible ruler. Worked out OK I think.

Image

Image

Then I cut the curve with my trusty jigsaw, which I treated to a new blade.

Image
User avatar
Yorick
Posts: 16736
Joined: Sat Mar 14, 2020 8:20 pm
Location: Paradise
Has thanked: 10263 times
Been thanked: 6885 times

Re: Boat build project

Post by Yorick »

Can we go skiing yet?

:banana-dance:
Zimbo
Posts: 204
Joined: Mon Apr 06, 2020 5:04 pm
Location: Gloucestershire
Has thanked: 87 times
Been thanked: 135 times

Re: Boat build project

Post by Zimbo »

Used the bit I'd cut off to mark out the other side

Image

Back to the jigsaw,

Image

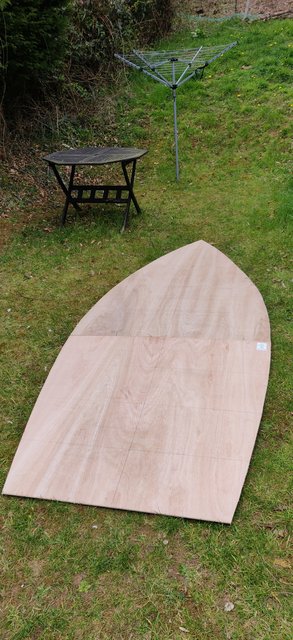
and repeat for the back section as it's too long to fit on one sheet,

Finished off with this

Image
Zimbo
Posts: 204
Joined: Mon Apr 06, 2020 5:04 pm
Location: Gloucestershire
Has thanked: 87 times
Been thanked: 135 times

Re: Boat build project

Post by Zimbo »

Yorick wrote: Fri Apr 16, 2021 7:03 pm Can we go skiing yet?

:banana-dance:
Ha Patience!!
User avatar
Cousin Jack
Posts: 4452
Joined: Mon Mar 16, 2020 4:36 pm
Location: Down in the Duchy
Has thanked: 2550 times
Been thanked: 2285 times

Re: Boat build project

Post by Cousin Jack »

So far, so good, but it looks more like a surfboard than a boat at the moment. We need ribs, and transoms, and rowlocks and all that nautical stuff. :D
Cornish Tart #1

Remember An Gof!
Zimbo
Posts: 204
Joined: Mon Apr 06, 2020 5:04 pm
Location: Gloucestershire
Has thanked: 87 times
Been thanked: 135 times

Re: Boat build project

Post by Zimbo »

Cousin Jack wrote: Fri Apr 16, 2021 7:27 pm So far, so good, but it looks more like a surfboard than a boat at the moment. We need ribs, and transoms, and rowlocks and all that nautical stuff. :D
Transom will be cut out tomorrow / Sunday, along with the sides, seats and stringers. That's the plan anyway, it'll have to fit in around MotoGP qualifying obviously!
demographic
Posts: 3028
Joined: Mon Mar 16, 2020 9:30 pm
Location: Less that 50 miles away from Moscow, but which one?
Has thanked: 1346 times
Been thanked: 1722 times

Re: Boat build project

Post by demographic »

Got a mate who built herself a stitch and glue canoe a while ago. She's a joiner by trade so is pretty handy, in fact I'd go as far as to say she's one of the best joiners I've worked with.
Quite fancy the idea of making a teardrop trailer using that technique but I'm not entirely sure I want one at the end of it cos I have a van for that.

Yambo has done some stitch and glue stuff also IIRC.


Good thread, keep em coming.
Zimbo
Posts: 204
Joined: Mon Apr 06, 2020 5:04 pm
Location: Gloucestershire
Has thanked: 87 times
Been thanked: 135 times

Re: Boat build project

Post by Zimbo »

If anybody fancies some reading up / inspiration, these are the boats I was considering and may progress to one or two more of them as time goes on ...

https://spirainternational.com/hp_wood_boats.html
User avatar
Yambo
Posts: 2470
Joined: Mon Mar 16, 2020 8:08 pm
Location: Self Isolating
Has thanked: 598 times
Been thanked: 1647 times

Re: Boat build project

Post by Yambo »

Good start Zimbo!

Is that a Glen_L design? I kinda like the CLC boats and plans but if they haven't got the boat you want to build . . .

What are you going to use to thicken the epoxy for filleting etc?
Zimbo
Posts: 204
Joined: Mon Apr 06, 2020 5:04 pm
Location: Gloucestershire
Has thanked: 87 times
Been thanked: 135 times

Re: Boat build project

Post by Zimbo »

Yambo wrote: Sat Apr 17, 2021 2:02 pm Good start Zimbo!

Is that a Glen_L design? I kinda like the CLC boats and plans but if they haven't got the boat you want to build . . .

What are you going to use to thicken the epoxy for filleting etc?
No, it's a Jeff Spira design, but about as simple as you can get!

For epoxy thickening I'm planning to use fumed silica, that's what my epoxy supplier has recommended.
User avatar
Yambo
Posts: 2470
Joined: Mon Mar 16, 2020 8:08 pm
Location: Self Isolating
Has thanked: 598 times
Been thanked: 1647 times

Re: Boat build project

Post by Yambo »

Zimbo wrote: Sat Apr 17, 2021 3:25 pm
For epoxy thickening I'm planning to use fumed silica, that's what my epoxy supplier has recommended.
I've no idea what fumed silica is. I have some colloidal silica but fumed. . . ?

There are lots of different options. Most of my gluing/filleting is done with a microballoon/silica mix (I buy it ready mixed). The microballons add very little weight to the build but are strong. The silica makes for a smoother mix. It's very easy to sand.

Other mixes, depending on where or what I'm bonding are:

1. Fibreglass microfibres. Cheap but make a super strong joint but not very easy to work with, the stuff is nasty shit and the only stuff I definitely wear a mask with. I use it for bonding where it's not going to be seen. adding silica can make the mix a bit smoother (as it does with anything basically). A bitch to sand.

2. Wood flour. Also cheap and mixed with a bit of silica can be made nice and smooth. It may be possible to match the colour of the wood so I use it sometimes for repairs, sanding a bit of same colour scrap to make the flour but usually the mix turns out a bit darker than the wood. Easy to sand.

3. Cabosil. Not sure if it's available in the UK but is very much the first choice for a lot of boat builders. I'm not sure what the cabo bit is but the sil bit is once again silica. No idea about sanding but told it's easy.

4. Silica. The more expensive option, or it is here. I've only used it a couple of times on its own and only for small jobs. Easy to sand.

There are various ways to apply the mix for filleting but it's always a good idea to tape off the seam areas first. For long runs I mix up the epoxy and fillers then dump it all into a cake makers piping bag. Snip the end off and squeeze along the joint. Throw away the bag when done and start again.

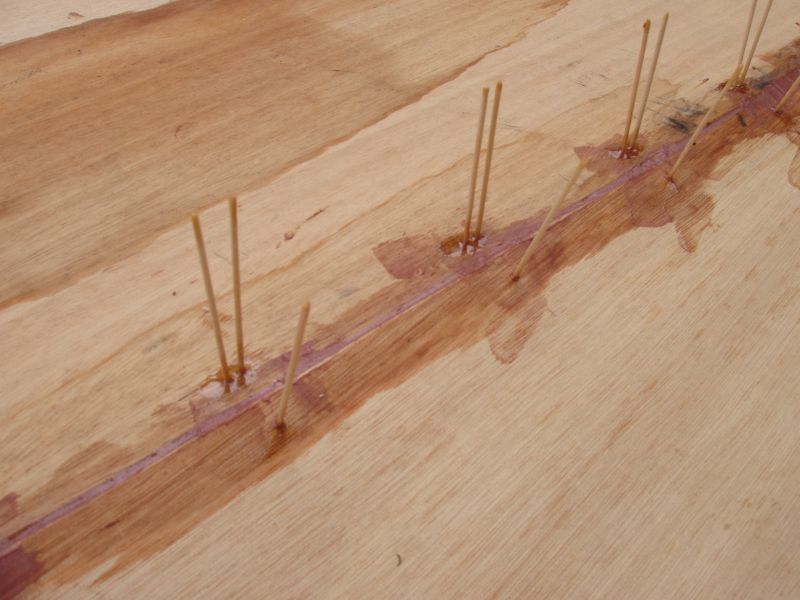
This is a seam (overlapping planks) filled with epoxy/microballoon mix. The cocktail sticks are filling the stitch holes. Not really necessary as the filleting mix will probably fill them but I'm anal that way. :P

Image

Keep the pictures coming and if you need any help, just shout - I'll be watching the progress. :thumbup:
Zimbo
Posts: 204
Joined: Mon Apr 06, 2020 5:04 pm
Location: Gloucestershire
Has thanked: 87 times
Been thanked: 135 times

Re: Boat build project

Post by Zimbo »

Thanks Yambo, all advice is useful to a newbie! I especially like the cake icer idea! When filleting a near vertical joint (the two side panels where they meet at the bow) is it advisable to turn the structure on it's end so the joint is horizontal, or will the epoxy, suitably thickened, stay in place? All ply joints will be covered in 75mm fibreglass tape and epoxied over the fillet internally, and then covered in the same tape saturated with epoxy on the outer seams as well. I decided not to sheath it in fibreglass to keep it light, but will saturate the ply inside and out with epoxy once built and before painting.

I didn't know what fumed silica is, so I looked it up:

Fumed silica (CAS number 112945-52-5), also known as pyrogenic silica because it is produced in a flame, consists of microscopic droplets of amorphous silica fused into branched, chainlike, three-dimensional secondary particles which then agglomerate into tertiary particles. The resulting powder has an extremely low bulk density and high surface area. Its three-dimensional structure results in viscosity-increasing, thixotropic behavior when used as a thickener or reinforcing filler.[1]
Zimbo
Posts: 204
Joined: Mon Apr 06, 2020 5:04 pm
Location: Gloucestershire
Has thanked: 87 times
Been thanked: 135 times

Re: Boat build project

Post by Zimbo »

This afternoon I cut up the 12mm sheet into transom, stringers, frames and seats, breasthook and rowlock doublers, and completed sticking the two side panel sheets together to make one 12 foot long 6mm ply sheet to cut the sides from.
Next job is to mark out and cut the side panels and cut out the apertures in the seat frames and stringers, then I can start fitting the components together ready for glueing. It's going well so far I think ...

Image

Image
User avatar
Yambo
Posts: 2470
Joined: Mon Mar 16, 2020 8:08 pm
Location: Self Isolating
Has thanked: 598 times
Been thanked: 1647 times

Re: Boat build project

Post by Yambo »

Zimbo wrote: Sat Apr 17, 2021 5:49 pm Thanks Yambo, all advice is useful to a newbie! I especially like the cake icer idea! When filleting a near vertical joint (the two side panels where they meet at the bow) is it advisable to turn the structure on it's end so the joint is horizontal, or will the epoxy, suitably thickened, stay in place? All ply joints will be covered in 75mm fibreglass tape and epoxied over the fillet internally, and then covered in the same tape saturated with epoxy on the outer seams as well. I decided not to sheath it in fibreglass to keep it light, but will saturate the ply inside and out with epoxy once built and before painting.

The filleting mix wants to be 'peanut butter consistency'. When I made my first boat it had been a few decades since I'd had any peanut butter so I didn't really know what they meant. I knew I didn't want it runny so just kept mixing in filler until I got a consistency that I felt would do the job. It was OK. :) The mix should stay in place but if it looks like it's going to sag, bung in some more filler or stand over it for an hour and keep putting it back where you want it. :lol:

I don't know what instructions you've got but my method of joining panels and filleting is fairly simple and makes a very strong joint.

Mix up some thickened epoxy and make small tacking fillets between the stitches to hold everything together. Don't leave blobs, make a small radius filleting tool and make small thin fillets. If you put one between each pair of stitches it'll be easily enough to hold the panels together.

Next day, remove the stitches and lose your temper because there's a twist in the hull! You can ignore this stage if you've made certain the hull is not twisted before the tacking up. :D With the stitches removed, make up a pot of epoxy and apply neat epoxy along the panels where you are going to fillet. Mix filler (your silica) into the remaining epoxy and apply the fillets. Small pots of epoxy are better than one big one because if the pot mix is too big it'll start getting hot and go hard. It's way too expensive for that so lots of smaller mixes is better. Once it is spread out it'll take a few hours to cook off but a big mix will go off quickly (and get very hot!). Once the fillets are done and you're happy with them, carefully lay the fibreglass tape on top of the fillets and gently settle it onto the fillets. mix up some more neat epoxy and brush that onto the taped seam and a bit wider than the tape. You'll find the brush may make the epoxy move a bit but just move it back where you want it with the brush. When you're done, the f/glass tape should be wetted out and transparent. Make sure there are no air bubbles anywhere and go and have that cup of tea you've been dying for, you've earned it. :thumbup: This method makes sure that the whole seam sets up and hardens all at the same time and makes a very strong joint.

Some people use masking tape either side of the joint, do the fillets and then remove the masking tape. They then apply the f/glass tape to the hardened fillets. It's your choice but if you're going to paint the boat . . . You can get really nice fillets applying the epoxy mix between the masking tape (and removing the tape after 3 hours or so) and if you are leaving the boat bright then that's fine. For me, I'm usually going to paint and strength in the joint is more important. lt's your choice basically. The second method will still be strong - people do it all the time but I think f/glassing the wet epoxy is better.

For the outer seams I'd fill any gaps with thickened epoxy (you're using a jigsaw, there will be gaps!), round over the joint (fibreglass does not like sharp edges or corners), fill any gaps that appear after rounding over, sand them smooth then wet the wood with unthickened epoxy, apply the tape and wet it out fully removing any excess just as you would apply fibreglass to any bit of plywood.

I couldn't tell from the plans but how are you going to join the bottom and side panel pieces together? Do the plans just call for a butt joint or are you scarfing them? If it's a butt joint I'd be inclined to reinforce the joint with a full width bit of plywood and a strip of fibreglass between the panel and the reinforcing piece, all glued up at the same time. Personally I'd do scarf joints but you've already cut the bottom panels . . .