1977 Honda CB550 K3 re-commissioning
- Tricky
- Posts: 1819
- Joined: Sat Mar 14, 2020 9:46 pm
- Location: Chilterns
- Has thanked: 2564 times
- Been thanked: 2680 times
1977 Honda CB550 K3 re-commissioning
A little bit of background on this one- it is a 1977 Honda CB550 K3, which for anyone who doesn’t already know was sort of the touring-spec CB550 (- the 550F was sold alongside it, it pretty much the same apart from paint and a 4 into 1 exhaust system, but aimed I think at the sportier rider )
Anyway, it was bought by my (slightly) younger brother getting on for 15 years ago on a whim, mainly I think as it was a bike he loved the look of back in his late teens/the twenties (he’s 60 now), but never got around to owning back then, and this particular bike had come up at a local-ish dealer to him at what he thought was a sensible price.
It’s a UK bike with only 13k miles from new, was just about totally original apart from handgrips, tyres, battery, etc and in decent nick as although there was a little degradation of engine paint, etc, the exhausts and tinware were mint, was low mileage and it had no evidence of ever being on its side or “restored”
So back then he bought it, rode it to the golf club once or twice in the first few months of ownership, which was probably 20-30 miles use tops, then it languished in a corner of his garage until a few weeks ago when I went and picked it up with the idea of getting it running again and sold.
I have a bit of a soft spot for 70s and 80s Hondas ( and Yams and Suzukis and Garellis and Fantics and Puchs ), having spent just about every Saturday and school holiday day working for two different bike dealers from the age of 11 until I went off to college, so this was going to be a real trip down memory lane for me.
Oh, and although as I type this, the bike is now just about done and ready for sale, this thread is likely going to be done over a few days/weeks, as there will be a fair few words to type...
Anyway- on with the thread-
On initial inspection, the last 10+ years of standing idle have been kind to – it was in a detached garage with no heating so I was expecting it to be a pile of rust but not so, on pulling it out of his garage, it generally looked pretty good
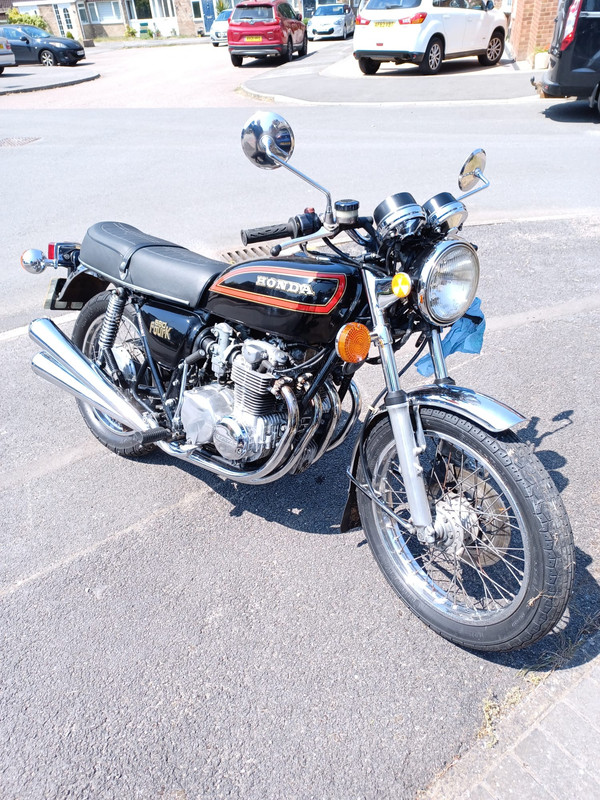
Immediate issues were that the throttle/carbs had seized solid with no movement at the twistgrip, the front brake was seized on and the lever came back to the bar, and when we turned the fuel tap on, disgusting-smelling petrol ( not unsurprisingly) came straight out of the bottom of the carb overflows.
Oh and one of the (non-standard) handle grips was all manky and rotten
But on the positive side, exhausts all looked as they were 15 years ago, the tank looked sound inside and the tinware/brightwork hadn’t suffered too badly except for an unfortunate sort of stain on the top of the tank that has sort of run down the side, am guessing from some insect or woodland-creature’s excreta, but a bit of T-cut and elbow grease will hopefully sort that
So the first thing once I’d got it on the bench was to get those carbs off, sort the seized throttle issue and leaking carbs- a job I wasn’t particularly relishing as it’s a bit of a pain in the arse getting the carbs on these in and out, ( I take the battery, battery carrier and airbox out rather than fighting with the ( rock hard in this case) carb rubbers and potentially damaging stuff ) and they would of course almost certainly be totally gunged up and require a lot of internal cleaning.
On the positive side though, taking the tank off is a breeze on these with no tools required- flip the seat up, pull the petrol pipe off, pull the rubber back that secures the back of the tank to the frame and it simply slides off- pretty grubby under there, but to be expected, and nothing scary so far
With the carbs on the bench, I started to see the state of them- a bit yucky as expected, and the seized throttle issue was down to the two outer carb slides being gummed/corroded solid in the bodies.
As the job was non-time critical (let’s face it, what’s another few days or weeks when it’s been sitting unloved for the last 10+ years : ) , I squirted a load of Plus Gas down the carb bodies over a period of a few days in the hope that would do the trick.
It did for No4, but after a week, no1 slide was still well and truly internally welded to the carb body, so out came the blowtorch which did the trick.
Once the slide was free, I could then remove it from the carb and clean it and the internal surface of the carb body up, and all was good.
Although the needles looked surprisingly decent and clean, I’d bought carb overhaul kits which included new ones so they went in.
As for inside the float chambers, pretty horrible as expected ...
I removed all the removable bits and put as much as I could through the ultrasonic bath, and after soaking in carb cleaner, gave all the air and fuel passages a good blow-through with the airline before re-assembling with new top gaskets and float bowl seals, along with new emulsion tubes, main jets, pilot jets, and float needles.
More to follow- getting those carbs back on, oil change (including removing rounded off filter bolt ), setting up ye olde-worlde points/ignition timing, air filter, valve clearances, sorting the brakes,and any electrical issues etc and anything else I find along the way!
- weeksy
- Site Admin
- Posts: 23416
- Joined: Sat Mar 14, 2020 12:08 pm
- Has thanked: 5450 times
- Been thanked: 13085 times
- Skub
- Posts: 12167
- Joined: Mon Mar 16, 2020 5:32 pm
- Location: Norn Iron
- Has thanked: 9819 times
- Been thanked: 10144 times
Re: 1977 Honda CB550 K3 re-commissioning
Super job,I'll enjoy seeing progress,even though it's a poxy old ghey Homda.
Those rubber seals on the float bowls may not like E10. I know a man who used to make them,but doesn't now as the ethanol swells them up. Maybe get away with E5 or the non ethanol stuff,if you can get it. No one does it here.
"Be kind to past versions of yourself that didn't know what you know now."
Walt Whitman
https://soundcloud.com/skub1955
Walt Whitman
https://soundcloud.com/skub1955
- Tricky
- Posts: 1819
- Joined: Sat Mar 14, 2020 9:46 pm
- Location: Chilterns
- Has thanked: 2564 times
- Been thanked: 2680 times
Re: 1977 Honda CB550 K3 re-commissioning
Those rubber seals definitely didn't- they were all toast, and the main reason I had to buy the carb kits- I hate any ethanol in petrol!Skub wrote: ↑Tue Aug 01, 2023 8:21 pm Super job,I'll enjoy seeing progress,even though it's a poxy old ghey Homda.
Those rubber seals on the float bowls may not like E10. I know a man who used to make them,but doesn't now as the ethanol swells them up. Maybe get away with E5 or the non ethanol stuff,if you can get it. No one does it here.
- Skub
- Posts: 12167
- Joined: Mon Mar 16, 2020 5:32 pm
- Location: Norn Iron
- Has thanked: 9819 times
- Been thanked: 10144 times
Re: 1977 Honda CB550 K3 re-commissioning
There are paper ones in the H1 and they weep now and again,so I need to tackle that one myself,maybe double up. I hate the smell of petrol on my hands,so I've been putting it off!Tricky wrote: ↑Tue Aug 01, 2023 8:29 pmThose rubber seals definitely didn't- they were all toast, and the main reason I had to buy the carb kits- I hate any ethanol in petrol!Skub wrote: ↑Tue Aug 01, 2023 8:21 pm Super job,I'll enjoy seeing progress,even though it's a poxy old ghey Homda.
Those rubber seals on the float bowls may not like E10. I know a man who used to make them,but doesn't now as the ethanol swells them up. Maybe get away with E5 or the non ethanol stuff,if you can get it. No one does it here.
"Be kind to past versions of yourself that didn't know what you know now."
Walt Whitman
https://soundcloud.com/skub1955
Walt Whitman
https://soundcloud.com/skub1955
- DefTrap
- Posts: 4495
- Joined: Tue Apr 14, 2020 8:23 am
- Has thanked: 2259 times
- Been thanked: 2190 times
Re: 1977 Honda CB550 K3 re-commissioning
Nice!
The 'Classic Octane' YouTube channel did 3 or 4 cb-series rebuilds. Worth a watch if you're a big fan of these classic Hondas.
- Rockburner
- Posts: 4375
- Joined: Sun Mar 15, 2020 11:06 am
- Location: Hiding in your blind spot
- Has thanked: 7814 times
- Been thanked: 2527 times
Re: 1977 Honda CB550 K3 re-commissioning
Is it worth getting some Viton sheet and making your own seals?Skub wrote: ↑Tue Aug 01, 2023 8:32 pmThere are paper ones in the H1 and they weep now and again,so I need to tackle that one myself,maybe double up. I hate the smell of petrol on my hands,so I've been putting it off!Tricky wrote: ↑Tue Aug 01, 2023 8:29 pmThose rubber seals definitely didn't- they were all toast, and the main reason I had to buy the carb kits- I hate any ethanol in petrol!Skub wrote: ↑Tue Aug 01, 2023 8:21 pm Super job,I'll enjoy seeing progress,even though it's a poxy old ghey Homda.
Those rubber seals on the float bowls may not like E10. I know a man who used to make them,but doesn't now as the ethanol swells them up. Maybe get away with E5 or the non ethanol stuff,if you can get it. No one does it here.
I've done that on the JAPton's Monobloc and it's such a time saver, and they actually seal!
non quod, sed quomodo
-
- Posts: 445
- Joined: Sun Apr 05, 2020 8:41 am
- Has thanked: 253 times
- Been thanked: 143 times
Re: 1977 Honda CB550 K3 re-commissioning
i remember in the mid to late 70s as a small kid being sent to the village shop by my mum with a handful of coins to get a back of sugar or something, and one of those went past (might have been the 750?) fella on the front with leather jacket on and with a girl on the back, all in leather, hair flapping about behind her helmet and i thought it was the coolest thing id ever seen.
- Skub
- Posts: 12167
- Joined: Mon Mar 16, 2020 5:32 pm
- Location: Norn Iron
- Has thanked: 9819 times
- Been thanked: 10144 times
Re: 1977 Honda CB550 K3 re-commissioning
How does the Viton stand up to the evils of ethanol?Rockburner wrote: ↑Wed Aug 02, 2023 8:24 am Is it worth getting some Viton sheet and making your own seals?
I've done that on the JAPton's Monobloc and it's such a time saver, and they actually seal!
"Be kind to past versions of yourself that didn't know what you know now."
Walt Whitman
https://soundcloud.com/skub1955
Walt Whitman
https://soundcloud.com/skub1955
- Rockburner
- Posts: 4375
- Joined: Sun Mar 15, 2020 11:06 am
- Location: Hiding in your blind spot
- Has thanked: 7814 times
- Been thanked: 2527 times
Re: 1977 Honda CB550 K3 re-commissioning
I "believe" it's supposed to be ok in ethanol, but I run the JAPton on very low or non-ethanol anyway.Skub wrote: ↑Wed Aug 02, 2023 9:40 amHow does the Viton stand up to the evils of ethanol?Rockburner wrote: ↑Wed Aug 02, 2023 8:24 am Is it worth getting some Viton sheet and making your own seals?
I've done that on the JAPton's Monobloc and it's such a time saver, and they actually seal!
non quod, sed quomodo
-
- Posts: 648
- Joined: Mon Mar 16, 2020 4:52 pm
- Location: Just across the border in the Republic
- Has thanked: 257 times
- Been thanked: 331 times
Re: 1977 Honda CB550 K3 re-commissioning
According to this Viton Chemical Compatibility Chart - Viton is rated A-Excellent for Ethanol.
Great reading. Carry on.
Blundering about trying not to make too much of a hash of things.
- Tricky
- Posts: 1819
- Joined: Sat Mar 14, 2020 9:46 pm
- Location: Chilterns
- Has thanked: 2564 times
- Been thanked: 2680 times
Re: 1977 Honda CB550 K3 re-commissioning
Well, it’s absolutely hoofing it down outside here and I’ve had enough of being wet today so I thought I may as well update this a bit more.
Whilst the carbs were on the bench, soaking etc, I’d had the (Motobatt) battery on charge for a few days on de-sulfate on the Optimate to see if it could revive it- the motor turned over nice and freely on the kick-start, but unsurprisingly the battery was completely dead after all those years sitting idle.
The Optimate failed to revive it, but before admitting defeat and buying a new one, I thought I’d try my Noco charger, it does Lithium as well as convential lead/acid, and it’s definitely better with deeply discharged batteries.
And FMOB, it did indeed revive it overnight, with it showing 13.4v so I whacked it back on the bike and gave it a go- here’s one of the (slightly less cringey or cheesy than most were) vids I was sending my brother to keep him up to date with progress…
I was of course being very over-optimistic expecting the battery to survive after all that time, it was worth a try, but the old one is obviously toast so a new Yuasa one was purchased from a local-ish Halfords, just for convenience really.
When I opened the box though, all was not as I’d expect as hopefully you can see in the pic, with some of the cells well down on acid (that's a different sort of acid that some of us used to get well down on in our younger years, of course )
Although I could have easily popped the lid and topped it up with distilled water, it’s a brand new battery so shouldn’t need to, so back it went for a refund- looking closer at the box it had a 2021 date on it so it had obviously been in stock a while.
I ordered a new Powerline one (I really rate these and particularly the Enduroline ones, having had a few over the years, ) from Tanya, and it arrived the next morning.
And I reckon it’s fair to say that the difference between the old and new batteries is night and day ( extra mature cheddar cheese on this vid )
Another thing I’d also done whilst the carbs were soaking was to change the oil and filter.
The oil that was in there looked clean ( most probably because it was likely changed by the dealer when he bought it all those years ago, and had only done 20 or so miles since), but Mart had supplied me with 4l of Castrol’s finest and a new oil filter with the bike and it was of course getting changed as a matter of course.
On closer inspection, it became pretty apparent, however, that although it looked as though the oil had been changed when he bought the bike, by the look of the oil filter housing , and it’s central securing bolt the filter hadn’t been done in a long time
It’s a very common occurrence on these old air-cooled Honda 4s and to a lesser extent, CX500s- the bolt itself has an M20 thread, but it only has a 12mm hexagon for your socket/spanner, at a guess to try and prevent over-tightening as it goes directly into the crankcase.
The problem is however, that it still often gets over-tightened, and even if it hasn’t been, if you’re using a 12-point socket or spanner it is very easy to round the head of the bolt, and that is obviously what has happened here, it looked like there have also been unsuccessful attempts to get it out previously too.
There's various approaches to this issue, the most usual is trying to hammer (or weld in extreme case ) a 1/2" or otherwise slightly smaller socket on there, but that can be messy and not almosts succesful.
Luckily, this very much ain’t my first rodeo, as the saying goes, and I have just the tool for the job in these grip-and-twist helical sockets, ideal for this situation
Very useful in cases like this, and made what can otherwise be a tricky ( ) job nice and easy
With the filter housing off, it was apparent that yup, although the oil was fresh, the filter definitely wasn’t.
Anyway, no matter- the old filter whilst it was a bit deformed was intact and it’s got a nice new one in there now, along with of course a new bolt- I went for one of the pattern ones with a 17mm head rather than OE Honda. I know some people are wary of using these as it is very much more possible to strip the thread in the crankcase with the extra purchase the bigger bolt head gives, but if you’re not a mechanical moron it isn’t a problem.
Next, I turned my attention to the front brake.
As previously mentioned, when the bike was pulled from its long-term resting place, the front brake was both stuck on, and the brake lever came back to the bar with no resistance at all, so obviously all was not well.
Mart (my brother) had taken the caliper off so it could be wheeled out of the garage and into the van, he’d also purchased a nice new OE Honda brake pipe to replace the aging and corroding one that goes between the caliper and the first part of the rubber hose, and a new set of pads and a seal kit, all from good old David Silver- as anyone who has an old Honda will know, they really are an excellent bunch, holding most things for these and other 70s/80s Hondas, at what I think are very reasonable prices too- on removing the old piston, it had some pitting on the chrome, so another order was put into David Silver for a new piston, and a few other bits for the carbs, etc at the same time- this is the disassembled caliper with old and new piston
The front brake on this era of Hondas really is a PoS design though- it’s a single-piston caliper that operates on a swinging beam, with the pad that has the piston behind it pulling the static pad onto the other side of the disc when you squeeze the lever, but a less effective brake you’d be hard to find this side of a SLS drum on an MZ I reckon, and that’s in the dry.
In the wet- forget it- they really were poor back then, as any number of us old fuckers on here will likely remember, at least the ones of us that haven’t totally reached senility will.....
Anyway, I removed the reservoir cap and sucked the nasty old fluid out. It was pretty manky in there so it got a good clean
I re-assembled the caliper with the new seal, piston, and pads, bolted it all back together, refilled with fluid, and bled it, which took all of about 10 seconds and we were there
Once that was done I adjusted the caliper swinger to give it the best possible chance of providing any retardation effect at all; - basically you just just wind the screw to the right of the caliper out until the inside (static) pad grips, then back in half a turn or so
That ( the typing, not the spanner stuff ) has taken me longer than I thought and I've had enough of sitting in front of a screen and tapping keys , so that's my lot for the moment - more gripping stuff to follow at some point including ignition timing, valve clearances and plugs, maybe even a super-exciting first start (or non-start ) vid in the next episode
- Dodgy69
- Posts: 5455
- Joined: Mon Mar 16, 2020 6:36 pm
- Location: Shrewsbury
- Has thanked: 1745 times
- Been thanked: 2085 times
Re: 1977 Honda CB550 K3 re-commissioning
Nice bit of video commentary that. Very interesting.
Yamaha rocket 3
- weeksy
- Site Admin
- Posts: 23416
- Joined: Sat Mar 14, 2020 12:08 pm
- Has thanked: 5450 times
- Been thanked: 13085 times
- Tricky
- Posts: 1819
- Joined: Sat Mar 14, 2020 9:46 pm
- Location: Chilterns
- Has thanked: 2564 times
- Been thanked: 2680 times
Re: 1977 Honda CB550 K3 re-commissioning
Will do- realistically it won't be before Pembrey, but yep will do in the following weeks before it gets sold, will be a nice little test for it
- Rockburner
- Posts: 4375
- Joined: Sun Mar 15, 2020 11:06 am
- Location: Hiding in your blind spot
- Has thanked: 7814 times
- Been thanked: 2527 times
Re: 1977 Honda CB550 K3 re-commissioning
You sound a lot older than I expected!
non quod, sed quomodo
-
- Posts: 1930
- Joined: Mon Jun 01, 2020 10:54 pm
- Location: Ballymena Co. Antrim
- Has thanked: 221 times
- Been thanked: 878 times
Re: 1977 Honda CB550 K3 re-commissioning
Sainsbury's super unleaded is E5.Skub wrote: ↑Tue Aug 01, 2023 8:21 pm Super job,I'll enjoy seeing progress,even though it's a poxy old ghey Homda.
Those rubber seals on the float bowls may not like E10. I know a man who used to make them,but doesn't now as the ethanol swells them up. Maybe get away with E5 or the non ethanol stuff,if you can get it. No one does it here.
- Skub
- Posts: 12167
- Joined: Mon Mar 16, 2020 5:32 pm
- Location: Norn Iron
- Has thanked: 9819 times
- Been thanked: 10144 times
Re: 1977 Honda CB550 K3 re-commissioning
Yeah,we have E5 Super in a few places,but since Shell and Esso don't operate here,we can't get the non ethanol stuff.Bigjawa wrote: ↑Thu Aug 03, 2023 12:45 pmSainsbury's super unleaded is E5.Skub wrote: ↑Tue Aug 01, 2023 8:21 pm Super job,I'll enjoy seeing progress,even though it's a poxy old ghey Homda.
Those rubber seals on the float bowls may not like E10. I know a man who used to make them,but doesn't now as the ethanol swells them up. Maybe get away with E5 or the non ethanol stuff,if you can get it. No one does it here.
"Be kind to past versions of yourself that didn't know what you know now."
Walt Whitman
https://soundcloud.com/skub1955
Walt Whitman
https://soundcloud.com/skub1955
-
- Posts: 1930
- Joined: Mon Jun 01, 2020 10:54 pm
- Location: Ballymena Co. Antrim
- Has thanked: 221 times
- Been thanked: 878 times
Re: 1977 Honda CB550 K3 re-commissioning
Try Circle K, they took over the Shell sites, I think they might be still connected?Skub wrote: ↑Thu Aug 03, 2023 1:10 pmYeah,we have E5 Super in a few places,but since Shell and Esso don't operate here,we can't get the non ethanol stuff.Bigjawa wrote: ↑Thu Aug 03, 2023 12:45 pmSainsbury's super unleaded is E5.Skub wrote: ↑Tue Aug 01, 2023 8:21 pm Super job,I'll enjoy seeing progress,even though it's a poxy old ghey Homda.
Those rubber seals on the float bowls may not like E10. I know a man who used to make them,but doesn't now as the ethanol swells them up. Maybe get away with E5 or the non ethanol stuff,if you can get it. No one does it here.