Globe / curved shelving…

What non motorbike related things are you doing, making, building, planning or designing
Silly Car
Posts: 854
Joined: Mon Mar 16, 2020 7:53 pm
Has thanked: 143 times
Been thanked: 497 times

Globe / curved shelving…

Post by Silly Car »

Following on from Screwd’s bin store, I thought I’d drag the shelf idea into its own thread.

Initial content below:
Silly Car wrote: Sun Sep 25, 2022 9:31 pm
Screwdriver wrote: Sun Sep 25, 2022 1:33 pm. If it works in Sketchup it will work in the real world.
Image

I hope so as I am hoping to make this (1,800mm x 1,800mm x 150mm)! Although I won't be relying on B&Q for absolute accuracy in the cutting (learned the hard way).

I just need to work out the best way to cut the slot joints, current plan is build a crosscut sled for the table saw with an indexing peg the same width as the saw blade and trench them out en masse once I have cut the first slot 'freehand'. Slots will either be 12mm or 15mm depending on material.

Alternatively, I'll have to make a router template and cut them individually...

...or seeing what the cost of sending it out to a CNC / laser cutting company to make the parts for me to assemble.
Silly Car wrote: Sun Sep 25, 2022 9:31 pm
Screwdriver wrote: Sun Sep 25, 2022 1:33 pm. If it works in Sketchup it will work in the real world.
shelving.PNG

I hope so as I am hoping to make this (1,800mm x 1,800mm x 150mm)! Although I won't be relying on B&Q for absolute accuracy in the cutting (learned the hard way).

I just need to work out the best way to cut the slot joints, current plan is build a crosscut sled for the table saw with an indexing peg the same width as the saw blade and trench them out en masse once I have cut the first slot 'freehand'. Slots will either be 12mm or 15mm depending on material.

Alternatively, I'll have to make a router template and cut them individually...

...or seeing what the cost of sending it out to a CNC / laser cutting company to make the parts for me to assemble.
Looks like a really interesting design and I would be happy to give you a few pointers from what I can see (largely regarding your intersections).

Not sure what your skill level is in Sketchup and I don't want to assume to know better.

I have found BandQ to be excellent for cutting within 1mm but you have to get the right person and give them precise instruction. But those large curves are going to need CNC/laser/wazer so I'd get them sent out for that.

Then you get into the world of producing a suitable file/drawing for CNC and that in itself can be a minefield though for a simple 2d cut, should be little more than a good scale diagram.
[/quote]
Count Steer wrote: Mon Sep 26, 2022 8:19 am Re CNC. There's quite a few around now but CNC-IT in Rudgwick, Surrey do some amazing stuff (I first saw them when they did a wood spiral staircase with external storage/bookshelves for a house on TV). Worth a look even if just for interest at cnc-it.co.uk

Edit: Oops! See working link below \/ Cheers Hoss. :thumbup:
Sketchup experience is minimal so the individual parts are not components and I haven’t drawn in the slots so would readily accept some pointers. I’m using the very last free desktop version (2017) as I just couldn’t get along with the current web version

Build plan:

1. Get strips of varying width cut a diy shed, assuming in tolerance, cut to length then move on, if not, rip each set to equal width
1a. Build cross cut jig / router template
2. Cut slots, based on the design each concentric “ring” of slots are all equals, so once the table saw / router template has been set up, multiple groups of slots can be cut before changing the depth of cut.
3. Using a router template, cut the arcs, remembering to flip 50% of the work pieces to either cut across the slots or the solid material. By starting with a template that suits the largest group first, I can then simply move the fence to suit the next sized group
Mussels
Posts: 4438
Joined: Mon Mar 16, 2020 9:02 pm
Has thanked: 836 times
Been thanked: 1238 times

Re: Globe / curved shelving…

Post by Mussels »

Rather than slots IKEA seems to prefer keeping the horizontals solid and slicing the verticals right through. The verticals are then attached using dowels, it works well and the shelves feel solid.
User avatar
Screwdriver
Posts: 2162
Joined: Sun Aug 09, 2020 12:15 pm
Location: Wherever I lay my hat, that's my hat...
Has thanked: 256 times
Been thanked: 740 times

Re: Globe / curved shelving…

Post by Screwdriver »

You can use a router and have the "slot ends" rounded without seeing that in the finished clipped together item. The straight slot hides the curve of the rounded end in both orientations.

All you need to do is make sure they intersect where you want them to and that you have a solid solution for fixing the sliding part(s) when they're in place. So yeah, I'd definitely rout it.

You'll be routing those great big curves anyway....
User avatar
Screwdriver
Posts: 2162
Joined: Sun Aug 09, 2020 12:15 pm
Location: Wherever I lay my hat, that's my hat...
Has thanked: 256 times
Been thanked: 740 times

Re: Globe / curved shelving…

Post by Screwdriver »

Silly Car wrote: Mon Sep 26, 2022 12:36 pm
Sketchup experience is minimal so the individual parts are not components and I haven’t drawn in the slots so would readily accept some pointers. I’m using the very last free desktop version (2017) as I just couldn’t get along with the current web version

Build plan:

1. Get strips of varying width cut a diy shed, assuming in tolerance, cut to length then move on, if not, rip each set to equal width
1a. Build cross cut jig / router template
2. Cut slots, based on the design each concentric “ring” of slots are all equals, so once the table saw / router template has been set up, multiple groups of slots can be cut before changing the depth of cut.
3. Using a router template, cut the arcs, remembering to flip 50% of the work pieces to either cut across the slots or the solid material. By starting with a template that suits the largest group first, I can then simply move the fence to suit the next sized group
OK let me get back to you on this. I too only ever use Sketchup 2017.

Meanwhile, just get used to the idea of sticking everything (everything) into it's own group. Right click, "group" done. Makes things much easier. Then use outliner to give everything a name so you can keep track of the bits.
User avatar
Screwdriver
Posts: 2162
Joined: Sun Aug 09, 2020 12:15 pm
Location: Wherever I lay my hat, that's my hat...
Has thanked: 256 times
Been thanked: 740 times

Re: Globe / curved shelving…

Post by Screwdriver »

You don't need strips or templates, just cut out the first arc with the router on a bit of string.

Straight cuts (with the router) to make the strips and you can rout out the slots too.

So I'd be doing that all out of an uncut full sheet. Lay it out in Sketchup to get all the right measurements, then it's all about having enough space and being careful with the setup.
User avatar
Yambo
Posts: 2470
Joined: Mon Mar 16, 2020 8:08 pm
Location: Self Isolating
Has thanked: 598 times
Been thanked: 1647 times

Re: Globe / curved shelving…

Post by Yambo »

I'd rough cut the arcs on my band saw and then use the router to finish off using a circular jig I'd made a couple of years ago. I'd have to make it bigger mind! I prefer to remove as much material as possible before switching on the router.

Of course, if you haven't got a band saw . . .

I'd definitely cut slots before the arcs.

"I've cut this piece of wood 3 times and it's still too fuckin' short!"
Silly Car
Posts: 854
Joined: Mon Mar 16, 2020 7:53 pm
Has thanked: 143 times
Been thanked: 497 times

Re: Globe / curved shelving…

Post by Silly Car »

Mussels wrote: Mon Sep 26, 2022 1:12 pm Rather than slots IKEA seems to prefer keeping the horizontals solid and slicing the verticals right through. The verticals are then attached using dowels, it works well and the shelves feel solid.
I hadn’t thought about dowels which would certainly be viable apart from installing it, I wouldn’t fancy trying to lift the entire unit up onto a staircase wall with it only held together with glue and dowels or trying to piece and glue in the shelves and hang the uprights on the wall at the same time… Camlocks won’t work either as the shelves will be seen from both top and bottom.
Screwdriver wrote: Mon Sep 26, 2022 1:33 pm You can use a router and have the "slot ends" rounded without seeing that in the finished clipped together item. The straight slot hides the curve of the rounded end in both orientations.

All you need to do is make sure they intersect where you want them to and that you have a solid solution for fixing the sliding part(s) when they're in place. So yeah, I'd definitely rout it.

You'll be routing those great big curves anyway....
It’d be interesting to see how tight the corners would be with either a full radius at the ends or with smaller radii in each corner.
Screwdriver wrote: Mon Sep 26, 2022 1:49 pm You don't need strips or templates, just cut out the first arc with the router on a bit of string.

Straight cuts (with the router) to make the strips and you can rout out the slots too.

So I'd be doing that all out of an uncut full sheet. Lay it out in Sketchup to get all the right measurements, then it's all about having enough space and being careful with the setup.
I think the radius of the longest section is circa 5m… I’m thinking a length of plastic trim, nails, pencil, jigsaw and sander for the first one then using that as the template for all.

Routing the slots with an appropriate template will hopefully ensure a tight fit whereas the is the potential for sloppy joints when cut with a table saw.

I’ve tried nesting the parts to reduce waste but the ease of forming the slots from square edges is worth more than a slight increase in waste. The design committee may well do away with the shortest, outside ‘ring’ as the depth wouldn’t lend it self to anything worthwhile which will save material.
Yambo wrote: Mon Sep 26, 2022 2:17 pm I'd rough cut the arcs on my band saw and then use the router to finish off using a circular jig I'd made a couple of years ago. I'd have to make it bigger mind! I prefer to remove as much material as possible before switching on the router.

Of course, if you haven't got a band saw . . .

I'd definitely cut slots before the arcs.

"I've cut this piece of wood 3 times and it's still too fuckin' short!"
Sadly no bandsaw as I gave away the table top Black and Decker one I had but a steady hand with a jigsaw will enable me to rough out the worst and I’ll put the router upside down on a make shift router table and then either use double sided tape on the curved template or make up a proper jig with toggle clamps.
User avatar
Screwdriver
Posts: 2162
Joined: Sun Aug 09, 2020 12:15 pm
Location: Wherever I lay my hat, that's my hat...
Has thanked: 256 times
Been thanked: 740 times

Re: Globe / curved shelving…

Post by Screwdriver »

Yambo wrote: Mon Sep 26, 2022 2:17 pm I'd rough cut the arcs on my band saw and then use the router to finish off using a circular jig I'd made a couple of years ago. I'd have to make it bigger mind! I prefer to remove as much material as possible before switching on the router.

Of course, if you haven't got a band saw . . .

I'd definitely cut slots before the arcs.

"I've cut this piece of wood 3 times and it's still too fuckin' short!"
My thinking was regarding the problem of positioning and ending the intersecting slots so they line up. In reality, I would definitely drill a hole at the end of them, probably start with that tbh. Then rout a bee line into that position to make the slot. I never have much luck cutting straight lines into tangents, always end up a bit off which could be a disaster with this interlocking design.

So if if I'm standing there with a router in one hand and all those pieces laid out ready to cut, I'd just throw a router at it and be done.
User avatar
Screwdriver
Posts: 2162
Joined: Sun Aug 09, 2020 12:15 pm
Location: Wherever I lay my hat, that's my hat...
Has thanked: 256 times
Been thanked: 740 times

Re: Globe / curved shelving…

Post by Screwdriver »

Silly Car wrote: Mon Sep 26, 2022 5:01 pm It’d be interesting to see how tight the corners would be with either a full radius at the ends or with smaller radii in each corner.

I think the radius of the longest section is circa 5m… I’m thinking a length of plastic trim, nails, pencil, jigsaw and sander for the first one then using that as the template for all.

Routing the slots with an appropriate template will hopefully ensure a tight fit whereas the is the potential for sloppy joints when cut with a table saw.

Sadly no bandsaw as I gave away the table top Black and Decker one I had but a steady hand with a jigsaw will enable me to rough out the worst and I’ll put the router upside down on a make shift router table and then either use double sided tape on the curved template or make up a proper jig with toggle clamps.
It is a head bender but if you are able to visualise how two intersecting slots engage with rounded ends at 90 degrees, you will discover they cover each other up perfectly. Trust me on this (or do a test). :thumbup:

I think 5m radius, 5m length of string! All you have to do is keep tension on it as you drive the router along the radius. A router will not be tempted to wander unlike a bladed item which will (!).

Why do you need a "template" for a straight slot?? It's a straight line in a given direction. Just cut it. This assumes you do the sensible thing and use a 20mm router bit for 20mm MDF etc. Sorry if I didn't make that obvious.

Bandsaw might give you a nice cut, jigsaw is the work of the devil and if you can make a long 90 degree cut with one you're a better man than I am Gunga Din.
User avatar
Horse
Posts: 11549
Joined: Sun Mar 15, 2020 11:30 am
Location: Always sunny southern England
Has thanked: 6187 times
Been thanked: 5087 times

Re: Globe / curved shelving…

Post by Horse »

Silly Car wrote: Mon Sep 26, 2022 5:01 pm I wouldn’t fancy trying to lift the entire unit up onto a staircase wall
How are you going to fix it on the wall?

We have a large (1m high) painting on the big outside wall over stairs. As it's fairly light I used copius amounts of velcro! Aided by Filly, on the landing, with a padded broom to push the top against the wall :D [No, I don't have suitable ladders :) ]
Even bland can be a type of character :wave:
User avatar
Yambo
Posts: 2470
Joined: Mon Mar 16, 2020 8:08 pm
Location: Self Isolating
Has thanked: 598 times
Been thanked: 1647 times

Re: Globe / curved shelving…

Post by Yambo »

Silly Car wrote: Mon Sep 26, 2022 5:01 pm
Sadly no bandsaw as I gave away the table top Black and Decker one I had but a steady hand with a jigsaw will enable me to rough out the worst and I’ll put the router upside down on a make shift router table and then either use double sided tape on the curved template or make up a proper jig with toggle clamps.

I made a simple bench top router table a couple of years ago. It was from a fairly posh design (https://www.youtube.com/c/PatrickSullivan) but I didn't bother too much with waste removal, I just stick my hoover pipe where it'll do most good. I was lucky in that I skip dived for a reasonable sized piece of 32 mm MDF for the top and I've made two tops, one for longer work. I also made two plates for both of my small routers so I can swap around for whatever I'm working with.

As a project, it was simple and quick and I use it way more than I thought I would. I have a couple of pictures and If I can get them off my phone I'll post them. It really was worth taking the time to make it, and that wasn't very long.

I also knocked up a cross cut sledge for my table saw which gets more use than I thought!
Last edited by Yambo on Mon Sep 26, 2022 6:46 pm, edited 1 time in total.
Silly Car
Posts: 854
Joined: Mon Mar 16, 2020 7:53 pm
Has thanked: 143 times
Been thanked: 497 times

Re: Globe / curved shelving…

Post by Silly Car »

Screwdriver wrote: Mon Sep 26, 2022 5:34 pm
Silly Car wrote: Mon Sep 26, 2022 5:01 pm It’d be interesting to see how tight the corners would be with either a full radius at the ends or with smaller radii in each corner.

I think the radius of the longest section is circa 5m… I’m thinking a length of plastic trim, nails, pencil, jigsaw and sander for the first one then using that as the template for all.

Routing the slots with an appropriate template will hopefully ensure a tight fit whereas the is the potential for sloppy joints when cut with a table saw.

Sadly no bandsaw as I gave away the table top Black and Decker one I had but a steady hand with a jigsaw will enable me to rough out the worst and I’ll put the router upside down on a make shift router table and then either use double sided tape on the curved template or make up a proper jig with toggle clamps.
It is a head bender but if you are able to visualise how two intersecting slots engage with rounded ends at 90 degrees, you will discover they cover each other up perfectly. Trust me on this (or do a test). :thumbup:

I think 5m radius, 5m length of string! All you have to do is keep tension on it as you drive the router along the radius. A router will not be tempted to wander unlike a bladed item which will (!).

Why do you need a "template" for a straight slot?? It's a straight line in a given direction. Just cut it. This assumes you do the sensible thing and use a 20mm router bit for 20mm MDF etc. Sorry if I didn't make that obvious.

Bandsaw might give you a nice cut, jigsaw is the work of the devil and if you can make a long 90 degree cut with one you're a better man than I am Gunga Din.
A 5m radius via string wouldn’t be impossible to achieve so worth a try.

Template would help get slots perpendicular to edge, uniformity of width (assuming I can’t get a router bit in the right size), the right depth for each intersection and placement (by screwing a piece of scrap on the base to lock into the previous cut).

I am from the same school of thought when it comes to jigsaws, so a healthy margin would be left for the router to trim back to the correct line.
Horse wrote: Mon Sep 26, 2022 5:39 pm
Silly Car wrote: Mon Sep 26, 2022 5:01 pm I wouldn’t fancy trying to lift the entire unit up onto a staircase wall
How are you going to fix it on the wall?

We have a large (1m high) painting on the big outside wall over stairs. As it's fairly light I used copius amounts of velcro! Aided by Filly, on the landing, with a padded broom to push the top against the wall :D [No, I don't have suitable ladders :) ]
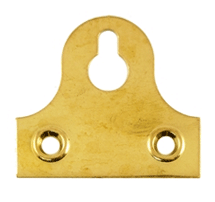
Keyhole slot brackets on the back of the uprights, pan head screws in the walls with sufficient length to enable me to dial out any imperfections in the wall for plumb / flatness unless anyone else has any better ideas.
Silly Car
Posts: 854
Joined: Mon Mar 16, 2020 7:53 pm
Has thanked: 143 times
Been thanked: 497 times

Re: Globe / curved shelving…

Post by Silly Car »

Yambo wrote: Mon Sep 26, 2022 6:45 pm
Silly Car wrote: Mon Sep 26, 2022 5:01 pm
Sadly no bandsaw as I gave away the table top Black and Decker one I had but a steady hand with a jigsaw will enable me to rough out the worst and I’ll put the router upside down on a make shift router table and then either use double sided tape on the curved template or make up a proper jig with toggle clamps.

I made a simple bench top router table a couple of years ago. It was from a fairly posh design (https://www.youtube.com/c/PatrickSullivan) but I didn't bother too much with waste removal, I just stick my hoover pipe where it'll do most good. I was lucky in that I skip dived for a reasonable sized piece of 32 mm MDF for the top and I've made two tops, one for longer work. I also made two plates for both of my small routers so I can swap around for whatever I'm working with.

As a project, it was simple and quick and I use it way more than I thought I would. I have a couple of pictures and If I can get them off my phone I'll post them. It really was worth taking the time to make it, and that wasn't very long.

I also knocked up a cross cut sledge for my table saw which gets more use than I thought!
I used to have a router table but a leaking shed so of put pay to the top but I did salvage the insert, t-slot tracks and fences. I reckon I’ll clamp the vacuum hose in roughly the right place, don the PPE and vacuum my hair and clothes once I’ve finished :D
User avatar
Screwdriver
Posts: 2162
Joined: Sun Aug 09, 2020 12:15 pm
Location: Wherever I lay my hat, that's my hat...
Has thanked: 256 times
Been thanked: 740 times

Re: Globe / curved shelving…

Post by Screwdriver »

I would use a rawl bolt to make hidden fixings. Literally just a long plain stud screwed into the wall that aligns with small holes in the back of say 3-4 of the deeper sections towards each corner of the unit. The shear strength of even a single stud would be sufficient to hang a car off the wall so all you'd need is a tiny hidden bracket to hold it against the wall and avoid pulling it forwards.
User avatar
Horse
Posts: 11549
Joined: Sun Mar 15, 2020 11:30 am
Location: Always sunny southern England
Has thanked: 6187 times
Been thanked: 5087 times

Re: Globe / curved shelving…

Post by Horse »

Have you thought about how you'll keep it square? Without any diagonal bracing it could easily go out of shape.

If you were to rebate the inner 3x3 squares to take a backboard, painted to match (or contrast) with the wall. Then some of these fixed onto that board:

Image
Last edited by Horse on Mon Sep 26, 2022 8:02 pm, edited 1 time in total.
Even bland can be a type of character :wave:
User avatar
DefTrap
Posts: 4495
Joined: Tue Apr 14, 2020 8:23 am
Has thanked: 2259 times
Been thanked: 2191 times

Re: Globe / curved shelving…

Post by DefTrap »

Silly Car wrote: Mon Sep 26, 2022 5:01 pm either use double sided tape
The new fangled way is masking tape and superglue. Works a treat.
Mussels
Posts: 4438
Joined: Mon Mar 16, 2020 9:02 pm
Has thanked: 836 times
Been thanked: 1238 times

Re: Globe / curved shelving…

Post by Mussels »

I hate trying to hang big heavy stuff on fiddly little screws, I'd find a way to use a French cleat for that.
User avatar
Horse
Posts: 11549
Joined: Sun Mar 15, 2020 11:30 am
Location: Always sunny southern England
Has thanked: 6187 times
Been thanked: 5087 times

Re: Globe / curved shelving…

Post by Horse »

Mussels wrote: Mon Sep 26, 2022 8:32 pm I hate trying to hang big heavy stuff on fiddly little screws, I'd find a way to use a French cleat for that.
Like this?


Seems a bloomin good solution!
Even bland can be a type of character :wave:
Mussels
Posts: 4438
Joined: Mon Mar 16, 2020 9:02 pm
Has thanked: 836 times
Been thanked: 1238 times

Re: Globe / curved shelving…

Post by Mussels »

That's the stuff. I found out about then from my wife, she knows next to nothing about DIY but everything about hanging heavy art work.
demographic
Posts: 3028
Joined: Mon Mar 16, 2020 9:30 pm
Location: Less that 50 miles away from Moscow, but which one?
Has thanked: 1346 times
Been thanked: 1722 times

Re: Globe / curved shelving…

Post by demographic »

I agree with much of what Yambo said.
Mark the curves out using a long length of ply, (or more likely two bits screwed together to get the large radius) then do the slots whilst its still just straight strips.so its simpler to get the slots perpendicular to the length.
Do the slorlts with a router in a crosscutting jig.
Rough the curves out with a bandsaw/jigsaw.
Finish them off with a router on that length of ply you marked the curves out with.
Perhaps using a circular guide bush and compression bit if your feeling flush.
I'd be tempted to do the slots in a few different sizes but not too many. Findiig the exact centre for perfect length slots for too many sizes will get on yer tits